Showing posts with label costuming. Show all posts

Wednesday, March 30, 2016

Rapier Armor

I've neglected to blog about this because I've never gotten photos that I'm really happy with. But I've decided that sub-par photos will just have to be ok for this one.

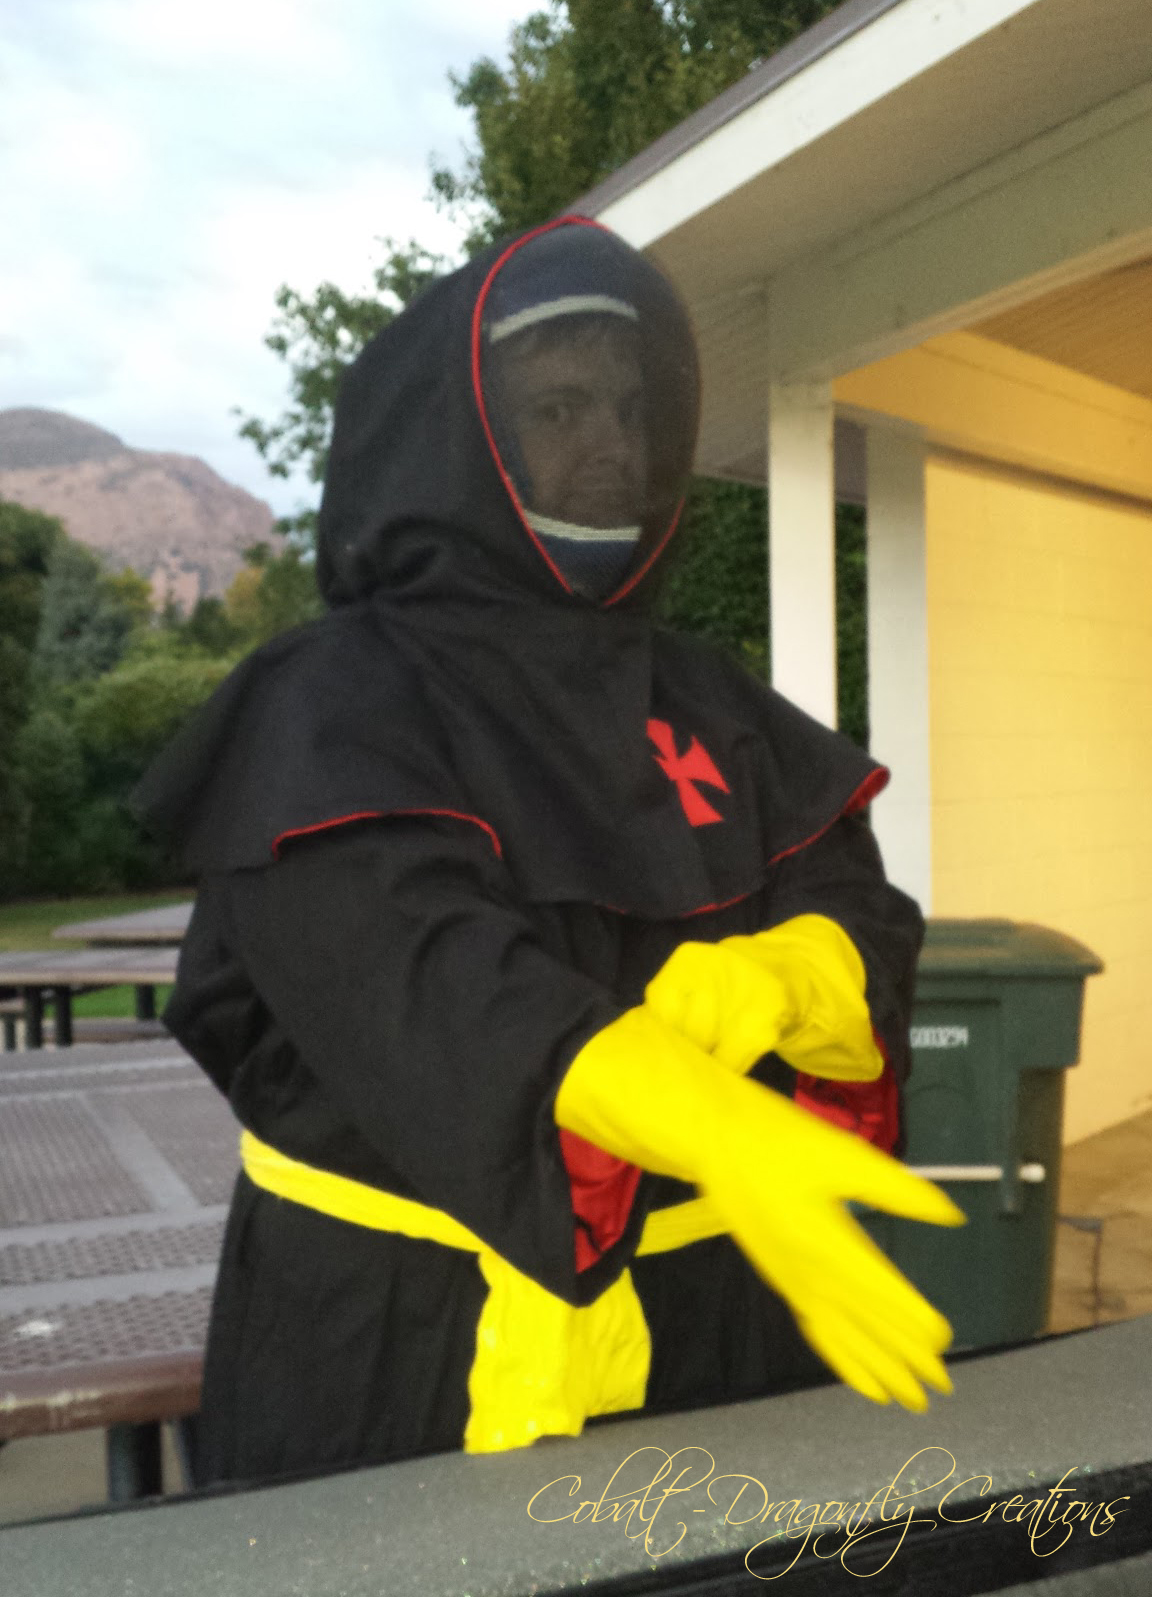
My dear Sven decided to take up rapier fighting, and needed armor that meets the safety requirements of the SCA. Rather than come up with a separate persona, he decided to maintain his Templar persona with a bit of appropriate anachronism, using this adorable image of fighting monks.

The robes are plain and simple, based on his regular Templar robes, with shortened length to avoid tripping. It's made of heavy black cotton twill, lined in heavy red cotton twill. He also wears two shirts underneath it, to ensure he has plenty of underarm coverage. The robes actually turned out a little too short, in retrospect. I suspect a second version will be forthcoming soon. The length issue is not one of safety, but one of aesthetics.


He now fights with cotton pants beneath rather than the tights, and his footwear varies depending on the fighting surface. His period boots have a serious lack of traction, which is something we're working on.

Fighting masks are required to have a back drape to protect the back of the head and neck. I decided to do a full hood over Sven's mask instead of a simple drape, to fit his persona. This is also heavy black twill lined in heavy red twill. It was tricky to sew onto the mask so the hood will never slide off his head, but the final product works very well, protects as needed, and looks really neat. I rolled the hood fabric a little when affixing it to the mask, to ensure the red lining would show. This also hides the white bib that is attached to the fencing mask. The Templar Cross is red linen appliqued into place.

Monday, October 15, 2012

When Costuming and Scribal Arts Collide

A while back I was asked to do a scroll in a "16th Century Dutch Style," which led me to doing some research to see if such a thing is feasible in the timeline desired. Most peeps in the scribal community are familiar with the Flemish style aka "squashed bug" style of illumination. The technical term is trompe l'eoile. So I had a vague clue, but didn't know a solid time frame on this style. The thing I found interesting is that this style is known as the Ghent-Bruges school. Many students of said school were from Southern Flanders and decided to wander further south, making a living in the fabulosity that is Italy.

The most notable Ghent-Bruges piece I've run across is the Grimani Breviary (yes, Italy, you soak up all that is awesome). (By the way, if any of you have a rich benefactor, please get them to send me a facsimile copy of the Grimani Breviary!)

So, here's the interesting part, for those interested in costuming. Check out fol 228 v. The clothing seems to be an interesting mix of Flemish and Italian... but what is up with the lady on the third row up, on the left? What is that on her head?

Details of fol. 228 v. from the Grimani Breviary

Monday, October 3, 2011

Boned Interlining, Part I

Tools
There are probably a myriad of ways to make a self-boned bodice, but this is how I do it.

I cut two of my pattern pieces out of heavy cotton canvas. A strong trigger, linen canvas, or coutil would also work. I used what was buried in my stash. I draw my boning channels directly onto my fabric, as this layer will not show at all.

The brand of zip ties I used
I then cut pieces of heavy zip tie (found at any local hardware store) at custom lengths to fit in these channels. Be sure to account for seam allowance when measuring what length to cut. I use my heavy snips to cut the plastic, simply because it's what I have. I can also use these same snips to cut spring steel boning.

Close-up of bones - left is filed, right is not
I then snip the sharp edges off of the bones and use a heavy metal file to round the corners. This will help prevent boning break-through. Sandpaper would also work for this step, but I use my file since that's what I have to file my metal bones. It makes pretty quick work of plastic bones.

Some people also dip the ends in a plasti-dip. I find this is less necessary for the zip ties. Metal bones do tend to need something as they are more prone to break-through, because they are not as thick. I have also had some luck with wrapping the ends of metal bones in medical tape in lieu of plasti-dip or nail polish.

I then number the bones from left to right, so I know later which bones belong in which channels without having to re-measure. I use a fine-tipped sharpie or similar so the ink doesn't rub off immediately. After this is done, I sew down my boning channels, with the two pattern pieces sandwiched together, creating channels in which to slide the boning down.

It is important to always sew the channels in the same direction, such as from top to bottom or bottom to top, but not to switch directions half-way through. This may cause some awkwardness from bulk of fabric under your sewing machine arm at some point, but if you change directions your fabric has a much higher chance of warping and causing wave-like wrinkles along the channels.

Once I am done sewing the channels, I give them a test drive and slide all the boning inside to make sure all pieces fit properly - if the channels are sewn too narrow, it will have to be picked out and sewn again as the boning won't fit. So far, I've yet to need to take that step thanks to careful measuring.

I will continue the next steps in another post soon!

Monday, August 1, 2011

Weekend Progress

For the ACC, I decided to try my hand at making my own lucet cords to lace my Sottana. I thought I was doing pretty well until I made a mistake and attempted to correct it - but failed at in my attempt. It looked good at first, until I put pressure on it as though trying to pull it tight for lacing - portions of it stretched out.


Ah well, more learning to do, I suppose. This is my first attempt at lucet weaving longer than three inches. I understand that there are also issues with the document-ability of lucet in this period, so I may not go with this after all - but it's a nice skill to have even if it's not 100% accurate for my period.


In other news, I worked on Sven's brick red tunic! He chose and purchased the trim. I had some black linen left over from other projects, so I decided to do the neck facing in black for added interest and contrast.

I measured and cut (in most cases ripped, actually - I love rectangular construction done in fabrics you can rip), and began assembling the tunic. I attached the underarm gussets and then flat-felled the seams by hand.

I usually try to do this using an invisible stitch, but I back-stitched the flat fell instead, using threads of linen drawn from scraps of leftover fabric. I need to work on keeping my stitches a more even length, but I'm pretty pleased with how straight they are looking, on the whole.

I attached the sleeves, side gores, and neck facing, and am now in the process of felling all seams by hand. I will sew the trim down by hand around the neck facing. Then I'll have to sew the sides up, and hem the sleeves and bottom. I might do a guard in black linen around the bottom hem... maybe.

Monday, July 18, 2011

Chocolate Kirtle - Sleeves

Guess who now has two completed fully reversible black/chocolate sleeves?

My green silk ribbons arrived in a timely manner, but I was stalled on the project while I painted. I'm pleased to now declare them done. I still have to add lacing rings in the chocolate kirtle itself, but this shouldn't take much time. If I manage that in time, pictures at Baron's War will ensue.

Saturday, July 9, 2011

This Week's Loot

I can now proceed with my chocolate/black sleeves, as my ribbon has arrived. But who buys just one yard of ribbon? I bought an extra yard of the other two colors I purchased alongside the green, as I would have the same issue with a shortage if I didn't, and also got some pale pink and blue - all silk. Color me happy. This ribbon feels so luxurious. *loves*

I also got a couple new books to augment my costuming library.


And now, back to painting...

Wednesday, July 6, 2011

ACC - The Partlet

The partlet I want to make for the ACC is this beauty, thought to be Maria de Medici, painted by Alessandro Allori, 1555-57, Florence (Moda a Firenze). Eleonora di Toledo is painted quite often with high-necked partlets, and there are numerous paintings of this period with ladies wearing high necked partlets with and without overgowns.


I fell in love with this partlet when researching ideas for my elevation gown, but opted for a collarless partlet at that time in order to not feel silly wearing a Florentine partlet with a Venetian gown. It was a painful choice (but the right one! Serafina and Janeanne did an AMAZING job on it). But now, I get to make my partlet.

I have ordered some adornment items such as black pearls and spangles; I have some gold cord which will hopefully service as couching cord. The original gems may have been jet (or something else altogether), not black pearl, but for the sake of cost that was my choice. It should have the right luster to feel right. I am a little concerned about the goldwork, but I'll do some tests to see if I can make it look right. There's also some gold needle-lace at the edge of the ruffle that makes me nervous.

I have the silk organza I want to use, but it looks like the embroidered part is backed by something, presumably to help the weight and stiffness - I have some buckram that might do the trick. I'll have to test how it looks under the silk and see how it reacts to embroidery to know for sure.

Tuesday, July 5, 2011

Loot!

I acquired this awe-sum fabric for a steal. Oh yes, be jelly. 2.75 yards of Jacobean crewel embroidered fabric. This will look great against my chocolate linen, no? Possibly the green too, but I was thinking of doing a Venetian out of that. Hmmmm...

Saturday, July 2, 2011

Silk Ribbons, or Why Crystal Fails at Math

Remember the green silk ribbons I bought to use as sleeve ties?

I'm eight inches short. I miscalculated how long to cut them, and now have to order more. Learn to count, noob. :(

I can't finish the linen sleeves (or rather, one of them), until I get more ribbon. Because I'm making these to be fully reversible, I sewed the ribbons down inside the sleeve when they were right-sides together, rather than tacking them on afterward. I took some steps to ensure that they won't pull out from strain (I hope).

The good news is that I got the scroll from Bethany and can spend my time painting until the ribbon arrives in the mail.

Wednesday, June 29, 2011

To Dutch, or not to Dutch...

My original ACC outer layer plan was to make a Dutch Cloak. Now... I may be waffling on that idea. I may lean toward a shoulder cape instead. Forgive the image quality below - I took photos of a book with my phone as my scanner is not hooked up at the moment.

Dutch Cloak (cappotto):

Versus Shoulder Cape (mantelline):

The Dutch Cloak typically had sleeves, and covered the hips, so is slightly longer than a shoulder cape. They are both circular, and are both found in Eleonora di Toledo's Guardaroba in Moda a Firenze.

My fabrics are a plum brocade with gold dragonfly details, a lovely textured gold brocade for trimming and possibly sleeves (undetermined), and gold satin to line it. As this will be designed for warmth, I anticipate interlining this with something yet undetermined. I also have a vintage blonde mink collar which I might be able to integrate somehow, but perhaps not as the necklines are all quite square, and it is a round collar.


At the moment I'm leaning toward the mantelline, because I'm liking the lines of the slightly shorter cloak better. But I'm not quite convinced. Opinions?

Tuesday, June 28, 2011

Artemisian Costuming Challenge

For the Artemisian Costuming Challenge, I will be doing a Florentine gown as popularized by Eleanora di Toledo, particularly in this image painted posthumously by Bronzino.

The kirtle, called a sottana in Moda a Firenze, will be made of butter yellow damask from my stash. The overcoat may or may not be a part of this challenge, depending on how cost prohibitive the fabric is and/or finding a patron. This gown has been in planning stages for about a year, and I do not want to compromise my vision due to the dollar limit on the challenge. I hope to obtain eggplant silk for the overdress. If this doesn't happen, the overdress will not go towards the challenge, but I will eventually be making it anyway (possibly within the challenge time-frame, possibly not).

The kirtle will be self-stiffened: no bodies will be worn with it, as was believed to be the case for Eleonora, according to Moda a Firenze.


I will be making a new camacia in white linen with embroidered details as my skin layer, and there will be a high-necked partlet as an accessory. My warmth layer will not be the overdress, but a Dutch Cloak, which Eleanora had several of in her wardrobe accounts. This is a circular short cloak, often with sleeves, or sleeve slits. Another post later will provide additional details on this piece of the challenge.

Friday, June 24, 2011

Sleeves

Wednesday and Thursday evenings were spent hiding in my basement, as the temperature is a few degrees cooler than upstairs. The window air conditioner unit is a lifesaver, but the air doesn't circulate particularly well, and I don't do well in the heat. The benefit of becoming a basement hermit is that my studio is in the basement.

I drafted a fitted curved sleeve pattern, largely based on the fitted sleeves in various commercial patterns such as Margo Anderson and Reconstructing History. This was an adventure in frustration as I have very bulky (fat batwings!) upper arms, but my arm length is ridiculously short. Remind me to install a mirror in my studio as well.

I figured I'd pin down the curved sleeve documentation a little later, as it's so accepted... and I've been a bit frustrated in trying to do so. I'll have to pull out my Janet Arnold library later to verify things... but all I've found so far is the use of curved sleeves in Alcega's men's doublet pattern. So yeah, the men did it... did the women really do it too? Probably, but I'd like proof. Regardless, I have my pattern, curved and all, and have cut out one layer in black linen. The other layer will be chocolate linen, and these will be reversible, with sewn-in green silk ribbons for tying them on. These ribbons are actually more olive/less minty than the picture shows.


I got my silk ribbons from Wm. Booth Draper, and I can't say how much I love this shop. Last year I bought their bone bodkin, embroidery waxer, and rosewood needlecase, and I *heart* them.

Friday, June 3, 2011

Shoes! (A Review)

I was thrilled to pieces when I got my Revival.us 16th Century slashed shoes.

I bought the black pair. I did find that these run quite large, and are very wide - great for those with wide feet, but beware if you don't. I got a size seven for my 6 1/2 foot (they do not have half-sizes), and have to stuff a significant amount of tissue in the toe. I'm certain a size six would have been better.

These have a quality hardened leather sole. For my tender footsies, I have opted to insert an insole for padding as I do tend to be on my feet a lot when at events. A tiny corner of the insole does show in the slashing on the inside of the foot, but not enough to be terribly distracting - I could also darken the insole with a sharpie to make it disappear into the black leather if it bothered me.

One issue with the hardened leather sole is that it is very slippery. I am a known clutz, so this is a dangerous thing for me. I picked up some non-slip grip pads from a drug store that have a sticky backing and stuck them to area equivalent to the balls of my feet. This helped the slippery factor significantly, but I have noticed that they fall off/disappear over the course of every event I've worn them at. I don't want to keep incurring the cost of re-applying new sole-grippers every weekend. Back in my dance days, if we were about to go on a stage that was particularly slippery, we'd slap a piece of duct tape on our shoes to help grip... not sure how well that would work here, and it seems a bit ghetto. So I'm in search of a long-term solution.

All this aside, I'm very pleased with the quality and workmanship of the shoes, and would definitely try another style from this company.

Tuesday, May 31, 2011

Blackwork

On a whim I decided to start some blackwork cuffs for a new camicia or smock. I was going to do this at Quest while sitting troll, but a combination of an awesome influx of volunteers and the event shutting down early, stopped this from happening. Therefore I started yesterday, in order to have something to do between changing loads of laundry.

I have never done any blackwork that's not monochromatic, so I pulled out some gorgeous red silk I've been saving for a rainy day. It just so happens that yesterday was quite rainy. Add that to some black silk, and a 16th Century Italian needlework sampler pattern, and I have hours of fun(The pattern I'm using is at a upper left diagonal from the large red pattern in the center-ish). My fabric doesn't have a perfectly even weave, so that changes it to look more diamond shaped than the original. I count threads rather than use waste-fabric. I've tried that method and I can't get the stitches to lay smooth and flat, and it's just so very fussy. I've been working on a blackworked caul for ages using waste fabric and I have struggled to finish it because of this. I'd rather have a slightly skewed pattern that can be interpreted as having *meant* to look like that, than deal with waste fabric.

The stitches on the far right were for getting a feel for the stitch length versus floss weight before starting my actual pattern. The "wrong" side of the embroidery isn't as clean and reversible as I would like due to changing colors, but it is improving as I go along. The picture is craptacular, but it does give you a feel for how far I got on yesterday.


I got a request to do a scroll for Uprising, which has a very short turn-around time, but I'm waiting for some more information on whether the recipient has registered arms or not before I begin.

Monday, May 30, 2011

Quest Recap

Quest for the Holy Lands started out rocky due to some issues with my office of the exchequer property (which has yet to be solved, but I'm confident that it will be soon) which left me without a table for Troll, Shade to sit under, and chairs to sit in. After some creativity and borrowing, we had Troll set up and running, and I had a bunch of volunteers to help me, which made my life so much wonderful, I can hardly express it. I am so deeply grateful for all those who helped me out all weekend.

I wore my new chocolate kirtle on Saturday! Of course, I waited until I'd been sitting/slouching in it all day before taking a picture so it's all rumpled and the nice smooth bodice...isn't. Le sigh. Ah well, I did get numerous compliments on it, and that pleases me.


Saturday evening it began raining, and by the time I left site (day tripped), my dress and petticoat had soaked up about 8 inches of water. The next morning as we were headed back to site, I got the phone call that site had received snow, and that both my troll shade and my personal shade were tragic victims of the wet snow's destructive power. Yay? I'm told they went down before most people even knew it was snowing.

After some cleanup, and a deep sigh of relief that Sven chose to come home with me rather than sleep in the pop-up as he wanted, we headed home, as the event was basically called quits due to inclement weather.

We still have T-shirts for sale though. I highly recommend them!

Thursday, May 26, 2011

Elizabethan / Jacobean Jacket

For many years I've been lusting after Elizabethan Jackets. I feel in love when I saw a fine lady wearing one at Known World Academy of Rapier/Known World Costuming when these two fine events were held together in Outlands, approximately 2003. Yes, I really am this slow to pursuing projects.

Mistress Isobel of Extreme Costuming fame renewed my love for this style with her amazing Maidstone Jacket. When the Plimoth Jacket was finally finished, I was head over heals. I'm not so insane as to think I might finish embroidering a jacket like either of these fine examples though... at least not in the next several years.

Other examples are this, from the Metropolitan Museum of Art, ca 1616

and this, from the Art Institute of Chicago

There are examples of some with lower necklines, some with collars, and some without. I think I'd opt for the style above, from the Art Institute of Chicago. I was gifted some interesting fabric from my grandmother, and it screamed "Elizabethan/Jacobean Jacket" to me the second I laid hands on it, and it has been a long-term plan to do this, after finishing a base gown to wear it over. Well, put your hands together folks, as I finished my chocolate kirtle which will also act as petticoat bodies under the long-awaited jacket.


In reality while the browns in these fabrics don't match exactly, they are a much closer match than the image indicates. The pattern is woven, and the fabric has a fascinating texture. I believe it is cotton. I do anticipate making a black skirt to go with this as well, in the future, possibly made of silk taffeta.

Drawers

On a whim, I decided I needed a new pair of drawers for this weekend's event. So last night I whipped up a pair - no measuring (bad Jaquelinne!!), just eyeballing it. This was not a good move, and I'm lucky they actually fit. They are not nearly as roomy as my other pair, but I can get them on and they aren't too tight. I added some sweet lace on the hems, and flat-felled all seams by machine. I would have done this by hand... but they're drawers, and I want to wear them tomorrow.

They're made from a random cotton twill fabric I had in my stash - heavier than I would have chosen from the store, but I think they'll be nice for the chilly rainy mountain weather we're expecting.

Not bad for a two hour project.

Tuesday, May 24, 2011

Petticoat Waistbands

This post is for you, lovely Lady Jane!

In a prior post about using elastic on Sven's pants, we discussed using elastic on petticoat and forepart waistbands, as they are hidden beneath over-skirts. As my foreparts tend to be quite heavy with beading and such, this is the method I use for making a painless waistband.

This is an example of a cotton broadcloth petticoat with attached forepart, with a flat front and gathered back. This was important, as it must have the circumference to fit over a farthingale and bumroll, but still be flat in the front so that the forepart lays smoothly. I backed my fashion brocade with cotton canvas so that it would be stiff enough not to sag from beading, as well as to hide farthingale hoop lines. I then beaded it and attached it to the petticoat. I hid the raw seams under strips of grosgrain ribbon, rather than adding bulk beneath the forepart by folding it under. This technique is straight out of Margo Anderson's patterns; I cannot take credit.

The waistband is where I deviate from Margo's instructions. She recommends sandwiching the skirt between two strips of grosgrain ribbon. I have done this in the past, and my seams were too sloppy for this to be satisfactory for me. With practice, perhaps it would work. I chose to take a wide strip of grosgrain about two inches longer than my waist measurement, and fold it in half. I pressed the ribbon to create a crisp line, and then sandwiched the petticoat within the ribbon and sewed it close to the edge. This way, I only had to sew one line rather than two. I finished the petticoat with skirt hooks using the excess ribbon length as an overlap. This is helpful in the event of weight fluctuation as additional hook "eyes" can be added easily.

Navy Blue Velvet Gown

Monday, May 23, 2011

Chocolate Kirtle

I was very tempted to make the Ultramarine blue kirtle first, but alas I needed to get started before the fabric was done being pre-shrunk. So in the end, the decision was dictated by my washing machine.

Friday night I cut two layers of cotton canvas interlining for the bodice, drafted and sewed boning channels, cut and filed boning, and watched the conclusion of Downton Abbey and all of Wuthering Heights. My boning is simple cable ties for this gown, as I didn't feel like dealing with spring steel for this project.

Saturday, after many trials and tribulations involving a marathon blocking my exit from the city, I finally arrived at Serafina's house to keep her company and keep us both focused on our projects. She was a machine zipping through curtains like mad while I worked on completing my bodice, including hand-worked eyelets... why is it that the first few eyelets of every project are complete crap? Oh well, they are serviceable. I am disappointed in myself that I didn't quite count right and I have an extra hole in my bodice for spiral lacing. Oops. Yes, I did extra eyelets for no reason. *facepalm*

Yesterday I cut out my skirts, graded the front of the waistline to account for the dip, pleated and attached said skirts to my spanky new bodice. These pictures are complete crap as I don't have a dress form to speak of (in the works though!), and are taken in my poorly lit bedroom. I am pleased with how the pleating ended up in the back. I don't love the front. I used three panels, with only one in the front so I could use the existing seams for the side lacing. There isn't enough pleating in the front, in my opinion, but I don't hate it enough to re-do it.


The Kitty was far too interested in my lacing cords for her own good. Next up, hemming the skirts.

Wednesday, May 18, 2011

Norse Pants v.1.2

Exciting News! Okay, maybe not very exciting. The espresso colored pants are complete, save a hem. I won't have much time to measure for the hem tonight, and if it doesn't happen, I may have to guess based on Sven's inseam measurement. Leap of faith?


After these pants are done, I'm going to make something for myself. Or help Serafina, if she needs it. The big question is... do I make the chocolate kirtle, or do I hold that for now and make something brighter, like perhaps an ultramarine blue kirtle? Ooooh the choices...